
The Teton Crest Trail is a bucket list trip for many – and for good reason. This trail takes you behind the infamous peaks, through wildflower-covered canyons, delivering jaw-dropping views every bit of the way. You’ll pass by an abundance of swimmable lakes, in every shade of blue imaginable, with the chance to see exciting wildlife. And for most of it, you’ll likely enjoy a lot of solitude. It really doesn’t get any better.
While most visitors to the park will enjoy the views from the park floor, you will be fully immersed in the Teton’s rugged and breathtaking beauty. If I had a nickel for every time I audibly said “Wow” while hiking this trail, well – you know the rest.
The Teton Crest Trail pushed me, tested my resilience, and brought me such gratitude. All while inspiring me to become a stronger hiker. If you’re a confident and avid hiker, consider taking on this amazing trail in 2025!
I hiked the Teton Crest Trail in mid-August 2024, after extensive research and planning. Here is everything I learned, to help you plan your trip and have the best experience possible.

teton crest trail facts
- Length: 35 – 40 miles, depending on starting point
- Location: Grand Teton National Park
- Days: 4 – 6
- Elevation Range: 6,900ft – 10,800ft
- Elevation Gain: ~7,000 – 9,000ft
- Elevation Loss: ~8,000ft
- Best time to go: July – August
- Route: AllTrails, NPS.gov Map
- Permits: 2/3 available walk-up, 1/3 released online January 7th, 2025
- Wildlife: Black bears, grizzly bears, moose, deer, marmot, pika, osprey
- Food storage: Bear canister required; free rental with permit
- Water: Streams plentiful along the route; bring filter or iodine
- Phone service: None
Jump ahead
Part 1. Planning
Part 2. Logistics
Part 3. Weather & Gear Suggestions
Part 4. Wildlife
Part 1. planning
When to go
July and August are the best months to tackle the Teton Crest Trail. Any earlier and you’ll likely experience a lot of snow still on the trail. Depending on the year and snow, this can extend into mid August. We hiked the trail August 14-18th and had one patch of snow to cross after descending a bit from Paintbrush Divide.
Rangers will be the best to inform you of current snow conditions on the trail and whether you should bring micro spikes or not. If you own them and are traveling to the area, I recommend bringing them and speaking with a ranger.
You can also check AllTrails for recent reviews regarding trail conditions.
Route
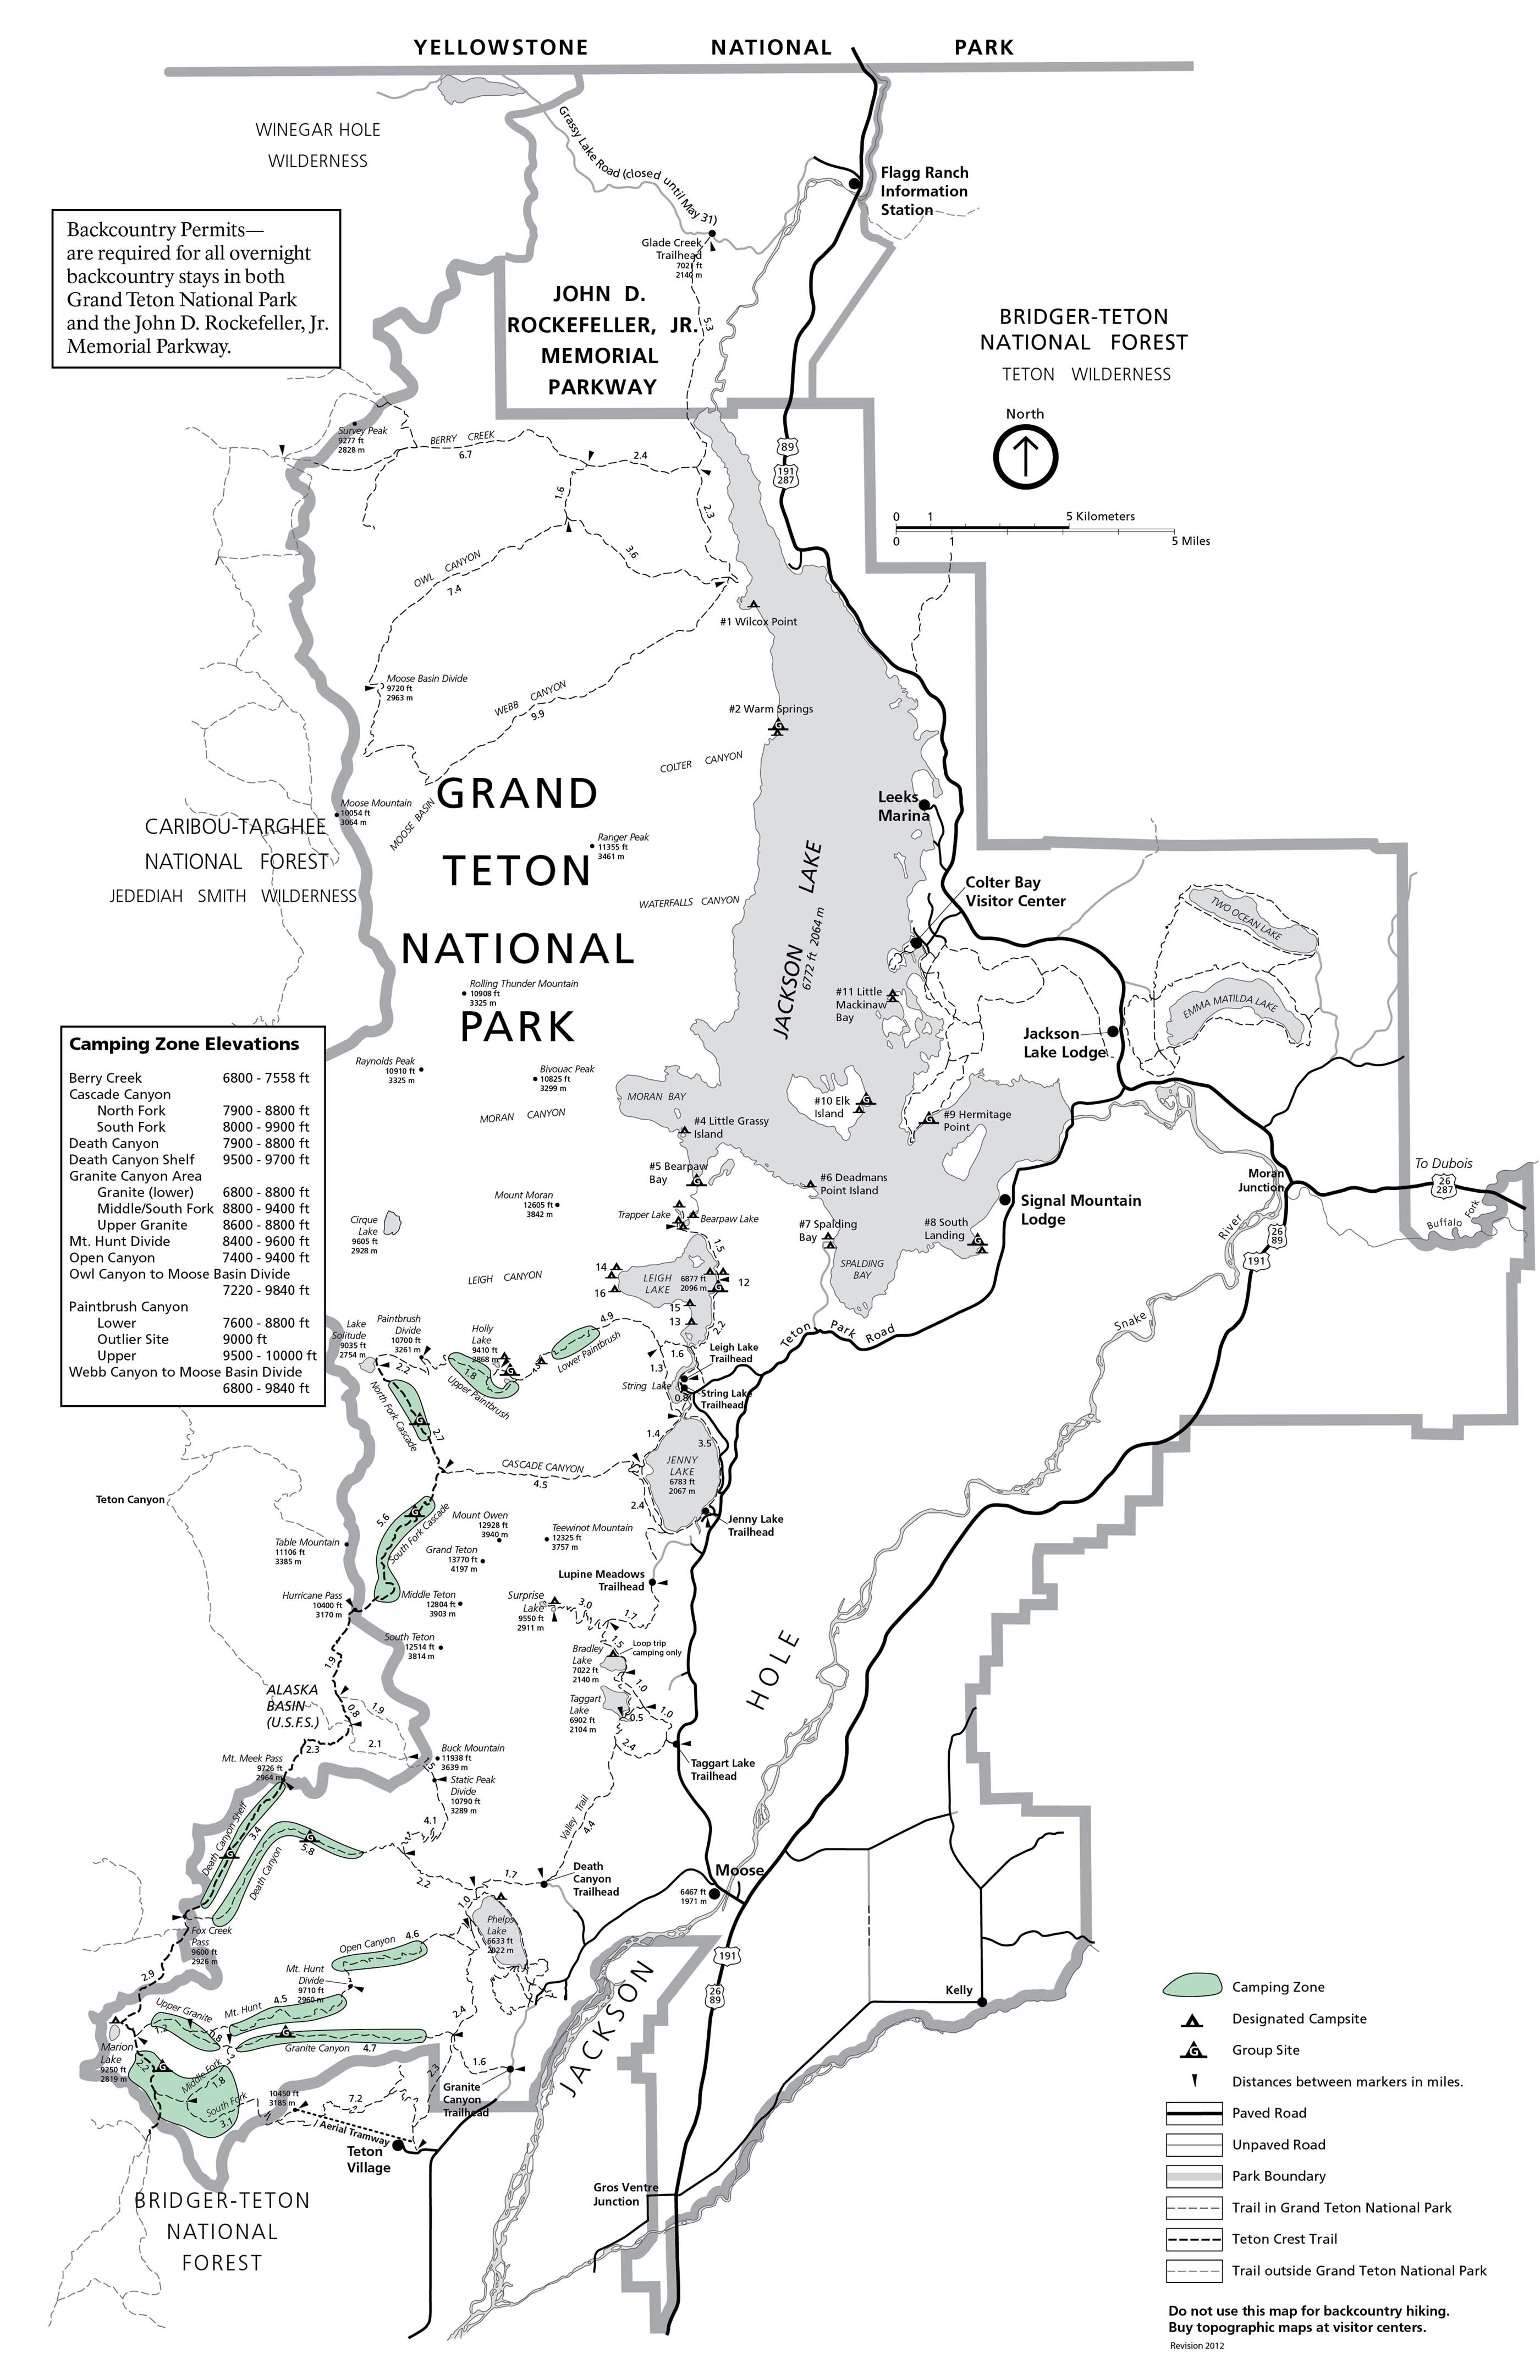
Before permits open, you’ll want to familiarize yourself with the park map and camping zones along the Teton Crest Trail. The interactive map shows here, from this NPS.gov link, is super helpful (click to enlarge.) People generally hike this trail northbound.
The Teton Crest Trail officially starts at Philips Pass (Highway 22). If you are a thru-hiking purist, this is where you’ll want to start your trek. Other starting points include Granite Canyon and the Aerial Tram, which leaves from Teton Village and allows you to skip roughly 4mi/2,400ft of climbing. The tram costs $50 and is a great option for those short on time.
Note – the Teton Crest Trail exits the park for two sections: Fox Creek Pass and the Alaska Basin. These are U.S. Forest Service (USFS) areas and camping in these zones does not require a permit. This will come in handy if you have trouble securing evenly-spaced camping reservations along the route. You can see them in the map to the right, to the west of the thick grey line representing the park boundary.
4 – 5 days is really the sweet spot for this trek. I do not recommend doing it in less, unless you are exceptionally fit, live at elevation, etc. There were certainly people out there doing it – we were passed by trail runners and stopped to chat with a guy doing the route southbound in 2 days / 1 night.
Our fit crew of late-20 somethin’s was happy with our 4-day itinerary… and 3 of us were mid-marathon training. Make of that what you will. Plus, unless you are short on time, you do not want to rush this one!
Teton Crest Trail Itineraries
| Itinerary Length | Suggested Camping Zones | Starting Point |
| 3-Day / 2-Night (Strenuous) | 1. Death Canyon Shelf 2. South Fork Cascade Canyon | Aerial Tram |
| 4-Day / 3-Night | 1. Fox Creek Pass / Death Canyon Shelf 2. North/South Fork Cascade Canyon 3. Upper Paintbrush / Holly Lake | Aerial Tram |
| 5-Day / 4-Night | 1. Marion Lake / Fox Creek Pass 2. Alaska Basin 3. North Fork Cascade 4. Upper Paintbrush/Holly Lake | Philips Pass/ Granite Canyon |
| 6-Day / 5-Night | 1. Marion Lake / Fox Creek Pass 2. Alaska Basin 3. South Fork Cascade 4. North Fork Cascade 5. Upper Paintbrush / Holly Lake | Philips Pass/ Granite Canyon |
Permits
There are two ways to secure permits for the Teton Crest Trail – 1. online via Recreation.gov or 2. walk up at one of three rangers’ stations in the park. Whether you’re planning months in advance or making next week’s plans, there is a viable option for you – and I really appreciate the way the park system provides this! Read on to see how I did a combination of both.
The below has my personal experience, as well as tips and tricks learned during my booking process. Make sure to also read the info on the NPS website here.
1. Online
You’ll notice that the USFS areas appear in the list of available sites. These are free, and are simply there for logistics – the site requires you to book a continuous set of dates. If you plan to stay in one the first night or in the middle of your trip, you’ll need to add these to your permit in order to check out.
Permit reservations open at 8:00AM MT on January 7th, 2025 (the first Tuesday in January every year). For the best shot booking online, make sure you are ready at 8:00AM and have familiarized yourself with a few itinerary options. When the page opens, you’ll select the “Mountain Camping Zones” option.
Within a few minutes, permits will be pretty picked over, and building a cohesive route will be tricky or impossible. I recommend snagging what you can, even if it doesn’t constitute a full route. Summer is still months away and people’s plans change. North/South Fork Cascade Canyon are central to the route, so if you can book a night at either of these, you’ll have no problem building a nice itinerary around it.
If you manage to secure your permits online, congratulations! You’re all set till summer. Permits must be picked up by 10:00am on the start date of your reservation, at one of the three ranger stations – the Craig Thomas Discover Center, Colter Bay Visitor Center, or Jenny Lake Ranger Station. Any permits not picked up will be made available to others for walk-up, so make sure to call the office if you won’t be there by 10. Full info on the NPS website here.
2. Walk-up
Grand Teton backcountry permits are available via walk-up starting at 8:00AM, 1 day before you plan to start hiking – so make sure to build this into your timeline. There are three ranger stations at which you can secure permits: the Craig Thomas Discover Center, Colter Bay Visitor Center, or Jenny Lake Ranger Station. If you have a very specific itinerary, you will walk to arrive well in advance of 8:00AM.
Walk up permits are competitive, and it can understandably feel risky to rely on this option. As the park system mentions on its GTNP page, the rangers are very familiar with the park and as long as you arrive early, they will make sure you leave with a nice itinerary.
If you check the reservation page on Recreation.gov in advance, you’ll notice most sites will show a “W” for walk-up. As the dates approach, these will begin to turn to 0s, as walk-up hikers snag these reservations. This can give you an advanced idea of what might be available when you go for your permits.
Only the permit holder (and alternate, if desired) need to be present at the ranger station to claim a permit. I didn’t see this info anywhere when I was planning my trip.
My permit Experience
I was unprepared when permits opened in January. I ended up with one campsite along the trail, but it didn’t really fit nicely into any possible itinerary. I proceeded to check the reservation page every so often. Permits certainly fluctuated over the months, but nothing I needed became available.
I was comforted in the fact that with no permits at all, you can still complete most of the Teton Crest Trail by camping in the USFS areas and exiting out Cascade Canyon instead of Paintbrush.
We traveled to Jackson early to acclimate and do some day-hiking. I was refreshing the app pretty frequently (I had 4 people flying out to join us on this trek – so I was feeling the pressure to make sure it was worthwhile!) I ended up snagging a permit for 6 for South Cascade Canyon, the night before we were going to the ranger station. This was a huge relief – this meant we could complete the full loop!
We arrived at the Colter Bay ranger station at 6:30AM on a Thursday, mid-August. We were the 4th group in line. About 20 minutes till, a ranger circulated a sheet of sites available to hikers at any of the three ranger station locations. When we got to the front of the line, I told the ranger I had a partial reservation, and she pulled it up. We ended up with Fox Creek Pass (USFS), South Fork Cascade Canyon, and Holly Lake!
Part 2: Logistics
Accomodations
You’ll likely need to arrive a day or two early, given you’ll need to either pick up your permits by 10am on start day, OR try for walk-up permits the day before. Additionally, flights into Jackson airport are limited — and if you’re at all like me, you won’t want to leave any room for error by way of a cancellation or delay.
Camping is certainly an option, however I can’t speak to campsite availability in/near the park. Since we spent almost a full week in the area before our hike, I can confidently recommend the following budget-friendly (for Jackson — that is) accommodations.
1. The Cache House (Hostel)
My boyfriend and I stayed at the Cache House the first night we arrived in Jackson. For a Saturday night in August, we paid just over $100 for a queen size bed in a large dorm room. As a couple we loved that it was priced per bed rather than person — but the price is certainly steep if traveling solo.
I have stayed in dozens of hostels and Cache House is a serious contender for the most comfortable. The queen-sized cubbies were private and cozy, complete with reading lights, plenty of outlets, and notably clean linens. The bathroom situation was as ideal as it gets in a hostel: separate closed-door rooms each with a toilet, shower and sink.
2. Mountain Modern (Hotel)
The night before our hike, we stayed in one of the 6-person rooms at Mountain Modern. At ~$700 (a little over $100/person), we had 3 queen-sized beds, 1.5 bathrooms and a kitchenette. This hotel is designed for adventurers, and it was absolutely perfect for us! Spacious enough for 6 people to spread out their gear, pack and re-pack, crank out (6 x 3 = …) 18 PB&Js, and get a last shower and good night of sleep before hitting the trail. It is also centrally located and walkable to restaurants, coffee shops, and shops for any last minute gear-grabs.
luggage Storage
The hotel we’d be staying at after our hike was happy to store our luggage for the few days before check-in. But unfortunately I don’t have a great suggestion if you are Airbnb’ing/camping. I thought Jackson would certainly have pay-by-day lockers at a sporting goods store or similar — but unfortunately I didn’t find any good options for this.
Transportation
If you’re coming by car, its recommended you park at the end of the trail and book transportation to the start. Below I’ll provide some options for that transport, along with what we did.
If you’re flying in, you’ll likely find that the cost of renting a car for the few days is higher than uber/car hire/public transport. Its all up to your personal preference for ease, convenience and cost – but we went the uber/car hire route, which I felt was a good balance of those three!
1. Transport from the airport
Uber is not reliable from the airport, especially at night — and many flights arrived around 8/9pm. If you are not renting a car, the bus is $10 and makes its last pick up around 9:40pm. According to the website, the last bus will wait until 10pm to accommodate late flights.
2. Transport to the start
Since we were staying right in town, we had no problem calling an uber to the start. For an UberXL, it cost us roughly $60 or $10/person.
If you are starting your hike at the Aerial Tram at Teton Village, the bus is an affordable and reliable option. Find information about fares here and a map here.
If neither of these options fit your needs, check out Teton Mountain Taxi.
3. Transportation after the hike
We booked a ride back to town with Teton Mountain Taxi and for a group our size, it was well worth it! The cost was $120 before tip ($20/person). To me, this was worth knowing that a ride would be waiting and ready to take us to hot food (and beer). Service in the park is spotty and I’m not sure about Uber availability — and was not about to leave that up to chance.
The taxi service was flexible and accommodating. I even called them from the trail about an hour before our scheduled pick-up time to push back an hour as we were running behind. They stopped by the Jenny Lake ranger station so we could return our bear canisters, and dropped us off at food in town.
Part 3. Weather & Gear Suggestions
You’ll need to be prepared for:
- The possibility of: rain, hail, high winds, snow patches on the trail & lightning
- The probability of: low nighttime temperatures, high mid-day temperatures, mosquitos & a lot of sun exposure.
Weather in the Tetons changes on a dime. The forecast for our trek was perfectly sunny, yet the first day, we experienced scattered storms that brought rain, lightning, hail and extremely strong winds. Parts of the TCT are very exposed. You’ll want to keep a close eye on the weather, avoid the passes if you see a storm approaching, and have working knowledge of lightning procedures.
Gear Suggestions
If you are new to backpacking, please also reference a full backpacking gear guide. For the Teton Crest Trail specifically, I would note:
- Temperature changes drastically through the day. Layers, layers, layers
- Bugs
- Quick moving storms
Most days I left camp in pants, a top & a mid layer. Possibly even a hat and gloves. By mid-day it felt like 85+ and I was in shorts and a tank, wanting to jump in every lake we passed by. So easily removable layers are key, including a light weight sun shirt.
Sun protection: shirt, screen, chapstick
The exposure + elevation on the Teton Crest Trail is not something to take lightly. I’m a naturally tanned human and I burned and peeled in areas I had never burned nor peeled — even with consistent sunscreen application and a sun shirt.
- Sun Shirt: I love the one by Mountain Hardwear; Womens, Mens
- Sun Screen: I carry the Shisheido Sunscreen Stick for easy application all day
- Chapstick: any brand with SPF 30+
Something to swim in!
No particular recommendation here — but not something you’ll want to forget! There are so many lakes and ponds to cool off in our your way, and you won’t want to miss out.
Footwear
For hiking, wear whatever you are most comfortable in. I wore hiking boots by La Sportiva on this trek — however my feet would’ve been happier in trail runners, and at no point did I feel I needed the added stability of a boot. So trail runner people, have at it.
Nights are chilly, and it wouldn’t feel right if I didn’t plug my favorite camp shoes. I bring these bad boys anytime its going to be anything under 60.

Rain shell
I cannot express this enough: weather here changes so, so quickly. You will want a rain shell readily available to you during the day. I use the Arcteryx Beta but the REI brand shells are a well-loved and cheaper alternative. Link to Mens, Womens.
Rain pants
Another essential item in the case of a sudden downpour. Plenty of options for rain pants — just want something loose to throw on quickly if needed. I wear a pair by Mountain Hardwear.
Micro-spikes
Even in mid-August, its possible there will still be snow on parts of the Teton Crest Trail. We had to cross a patch after coming over Paintbrush Divide, and it was a little spooky with a slope to one side. The rangers at permit pick up will be able to give you the most up-to-date status of snow on the trail, and whether or not you’ll need to carry micr-spikes. If you’re traveling to the area and own a pair already, its worth bringing them to avoid a last minute expenditure. I use the brand Kahtoola.

Bug Head Net
Mosquitos along the Teton Crest Trail can be quite the nuisance, especially at lower elevations in Cascade Canyon and Holly Lake/Paintbrush. I did not have one with me, and it was hard to hang around camp in the evening. You’ll likely be covered up everywhere else (chilly at night), so something for your head should suffice. Bug spray wouldn’t hurt if you can spare the space/weight.

Part 4. wildlife
Wildlife is likely one of the most exciting and yet simultaneously unsettling parts of the Teton Crest Trail. You’ll have the opportunity to see moose, deer, marmot, pika , osprey, as well as brown and black bears. Food storage in bear canisters is required and you should absolutely carry bear spray.
Bears
If you are flying, bear spray is conveniently available for rent from the airport. Review proper bear spray and bear canister protocol before embarking on your trip. There are many resources available on youtube, as well as rangers to consult in the park. With proper protocol, you can count on having a safe and seamless adventure in bear country. However its important to be prepared for all scenarios. On my trip, we saw two black bears who were unbothered by our presence.
General guidelines include:
- Speak regularly and loudly while hiking, to warn any wildlife in the area
- Every member of your group should have their own bear spray
- Have bear spray attached to your waist belt. If you need it, you’ll likely need it immediately. So make sure it is ready to deploy and easy to access
- Store all scented items (food, deodorant, chapstick, toothpaste, etc.) in the bear canister and place 100m from your camp at night
- If you encounter a bear, speak calmly and at a low register
- If the bear is with cubs or a carcass, back away first, before deploying bear spray, as bears in these scenarios are more aggressive
- Bear bells are generally not recommended
Moose
While we didn’t see any moose on our hike, we did see some earlier in the week near Jenny Lake. It was incredible watching them bathe and cool off in a small pond, and I was happy to have a vantage point at a considerable distance to safely observe them.
Moose can be aggressive and dangerous, particularly during mating season (males) and in the late summer with their calves (females). Keep a distance of at least 25m and never get between a moose and its calf. If charged, run and try to take shelter behind a rock or trees.
Gallery
Chronological photo gallery from our trip on the Teton Crest Trail.


Leave a Reply